
Web sockets | real time communication between front and back ends
NOTE: I have a new post in the pipeline about web sockets using Laravel’s Reverb which is new in Laravel 11 as well as Laravel’s echo on the front end. I will include a link to that post here once its up. This is a more general post so perfectly usable in PHP without a framework.
Its been a while since I’ve written a post and this is a good one (if I do say so myself!). In today’s fast-paced digital landscape, it’s essential to keep users engaged with up-to-the-second updates and seamless interactions. This could be notifications that pop up – usually in the top right of the screen, inline updates on the page or even for something like live chat.
In this blog, we’ll walk through the whole process, from start to finish of setting up our Laravel back end to push data to our NuxtJs 3 front end and have that display the notification to the user in the top right of the screen. This will be a very basic app but it should give you the main concepts.
There are, broadly speaking, 4 parts to this (not counting things like the OS, the web server software etc):
- Laravel back end – This is our API application
- NuxtJs 3 front end – Our user facing website
- NodeJs server needed as a message broker between the front end and back end
- Redis server which acts as a message queue.
This blog is largely based on this post -> https://dev.to/jszutkowski/real-time-two-way-communication-between-frontend-and-backend-using-sockets-5ghc. The author, Jarosaw Szutkowski, does an amazing job of laying out the principles and code of a simple PHP backend app and html/javascript front end app. In my own post, I’ll be using his code but I’ll specifically be fleshing it out a little and I’ll use Laravel for the back end and NuxtJs for the front end. I’ll also show you where to make some changes so that your messages are sent to specific users etc, rather than a global, everyone sees the message as it is in the original post. In other words, if I’m on a page on your site, and someone else is on the same page, I only receive the notifications relevant to me and they only receive what’s relevant to them.
Additionally, I often find myself reading blogs which deal with multiple parts like this one does and then scratching my head about which code goes where. Authors often seem to think that we’ll just know that this code belongs in the this file, or even in this server. In this blog I’m going to attempt to show you step by step. For this reason I’ve spun up a new, blank Ubuntu 22.04 server and we’ll go through everything step by step!
Ready? Lets get started.
Overview
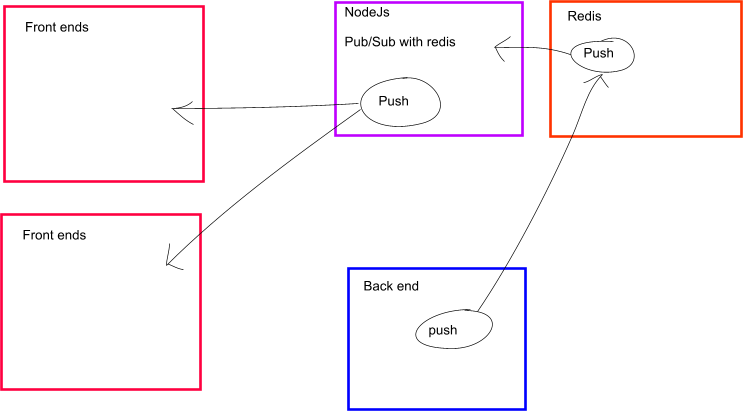
What’s happening here??
You’re back end has messages it needs to send to you front ends. It cannot do that directly but what it can do is make use of Redis’ pub/sub feature. Your back end publishes messages to your Redis server (in our image its just called push).
Likewise your NodeJs server also subscribes to your Redis server. When your back end publishes data to your Redis server on a channel name, your NodeJs server receives that data.
Your front end JS connects and subscribes via a socket to your NodeJs server. When your NodeJs server receives a message from Redis, it forwards it via a socket on the correct channel name.
1. Laravel Back End
The first step is to install composer. The download / install instructions can be found here: https://getcomposer.org/download/
In a nutshell, you download their installer, run their installer, then move composer to the /bin directory so its globally available.
Once you’ve installed composer and you type $ composer at the commend line, you should see composer output, including its version info:

I don’t recommend using Ubuntu’s installer for composer as its stuck on version 1 of composer which is very very much out of date.
Now that we have composer installed, its time to install Laravel. For this, we use Laravel’s documentation here: https://laravel.com/docs/10.x#your-first-laravel-project
We’re going to call this Laravel app “sockets”, so here’s how we create our Laravel app:
composer create-project laravel/laravel socketsOnce installed you’ll have a fully functional Laravel project. You can start up a server in Laravel’s artisan using the following command:
php artisan serveThis will give you output stating that the server is up and running (usually http://127.0.0.1:8000):
  INFO  Server running on [http://127.0.0.1:8000].
  Press Ctrl+C to stop the server
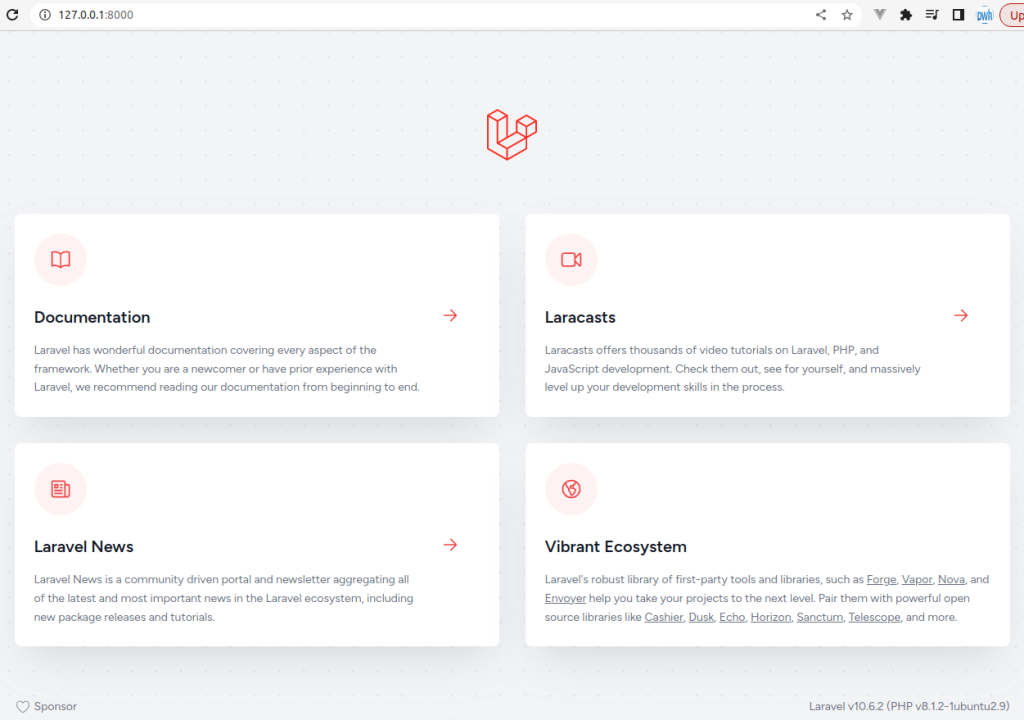
If you now open this in a web browser you should see the laravel default page:
As mentioned, we’ll be using a Redis server as the pub/sub message queue. We’ll use the PHP Predis library in Laravel to communicate with our Redis server (which we’ll install next).
To install predis, we use composer to require predis into our project like this:
composer require predis/predisLaravel Code
Finally, we’re on to writing the Laravel code! Its going to be super duper simple. We’ll have just two end points. One end point will be a “global” message queue which every user will see. The other end point will be specific to what you’re viewing on that page. In our example, it will be a temperature page for a certain city, and the notifications will be specific to that city. So if you’re on the page and looking at London and I’m on the page looking at Johannesburg, I’ll see Jo’burg updates whereas you’ll only see the London updates.
In your Laravel project, open the api.php route file at ~/sockets/routes/api.php
We’ll add two routes to this file. One called general, and a second one called temperature.
Add the routes like this:
Route::get("/general", function() {
});

Route::get("/temperature/{city}", function(String $city) {
});
Because these routes are in the api.php file they use the api middleware. Amongst other things, this means the URL path will be prefixed by /api/, eg, http://127.0.0.1:8000/api/general and http://127.0.0.1:8000/api/temperature/johannesburg.
Our Laravel app will publish messages to our Redis server which has pub/sub (publish / subscribe) functionality built in. Our NodeJs server subscribes to the Redis server to read these messages and passes them on to the front end. We have not set up the redis server yet, but for now, lets add our code into Laravel and then we’ll set the Redis server up next.
Modify the api.php file by adding our publish code, like this:
Route::get("/general", function() {

    $client = new Predis\Client([
        "scheme"    => "tcp",
        "host"      => "localhost",
        "port"      => 6379,
    ]);


    $client->publish(
        channel: "generalEvent",
        message: "Welcome to our site, hope you enjoy your stay"
    );

    return response()->json(["success" => "sent"], 200);

});

Route::get("/temperature/{city}", function(String $city) {

    $client = new Predis\Client([
        "scheme"    => "tcp",
        "host"      => "localhost",
        "port"      => 6379,
    ]);

    $client->publish(
        channel: $city."Event",
        message: "city: ".$city." - date: ".date("Y-m-d H:i:s")." - temparature: ".mt_rand(0, 32)
    );

    return response()->json(["success" => "sent ".$city."'s temperature"], 200);

});
Let’s dig in. Both routes are very similar so we won’t deal with each one, except for addressing the differences. We first create our Redis client. We pass in the scheme, host and port number into the Predis\Client constructor. In this case we’re working on localhost and port 6379 is the default redis port.
Next, we use our Redis client to publish our message. There are two parts to publishing a message. The channel and the actual message.
You post messages to a channel, and on the client side you subscribe to a channel. If you publish to a different channel, that message won’t be seen by the client who’s subscribed to the first channel. Make sense?
You’ll notice a difference in how we specify our channels for the general route and the temperature route. In the general route our channel name is simply the hard coded string value general. In our temperature route, the channel is made of up the prefix city- and then the city name passed in from the url path. So, for instance, if you visited the URL http://127.0.0.1:8000/api/temperature/london, then the the channel will be city-london. This is how we’ll separate out messages on the front end.
The message part of the published message is a string that will be sent. In our case, we’re sending a json string containing the city slug as well as the date and temperature (which is simply a pseudo random number).
That’s it for our Laravel backend. To send the general message, start the server using php artisan serve and then visit http://127.0.0.1:8000/api/general.
To send a temperature message visit http://127.0.0.1:8000/api/temperature/{city} where {city} can be any slug type string (we don’t check and validate in this example, so anything will do, eg, new-york, london, johannesburg, etc).
2. Redis Server
Right, so now lets set up our redis server. Its super simple to set up. On Ubuntu, simply install it using your OS’s package manager, like this:
sudo apt-get install redis -yThat’s really it. HOWEVER, CAVEAT LECTOR: When you install Redis on a publicly available server like this, by default its open to the world. There are a gagillion scripts which scan public IP addresses for open Redis servers to exploit and your Redis server will be cracked within minutes – I’m not joking or exaggerating. So, when you’re ready to move your setup to a real, live server, you’ll need to either enable authentication on your Redis server, or you’ll need a firewall to only allow connections from your application servers.
3. NodeJs Server
We need to install NodeJs on our server. To install NodeJs, we’re not going to use the OS’s installer as the version is pretty old. We’ll use the third method from this link to install NodeJs: https://www.digitalocean.com/community/tutorials/how-to-install-node-js-on-ubuntu-20-04
We download and run NVM (Node Version Manager):
curl -o- https://raw.githubusercontent.com/nvm-sh/nvm/v0.39.3/install.sh | bash
We source nvm then get the list of versions, pick a version and install it!
source ~/.bashrc
nvm list-remote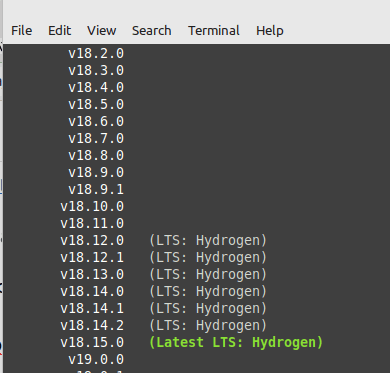
We’ll install v18.15.0 like this:
nvm install v18.15.0Once successfully installed you can check that its running by typing node and -v to get the version:
node -vThis will print the version to the console:

Now that NodeJs has been installed, let’s get started with our project. The first step is to set up our package.json file. This is the file which contains the requirements and dependencies for our project. Create a file called package.json with the following:
{
	"name": "socket_test",
	"version": "1.0.0",
	"main": "app.js",
	"license": "MIT",
	"dependencies": {
		"express": "^4.18.1",
		"redis": "^4.5.1",
		"socket.io": "^4.5.4"
	}
}
The dependencies are:
express: This is the web server which will be that will be responding to the requests from the client.
redis: This is the redis connector which will use the same pub/sub mechanism as the Laravel app above.
socket.io: This is the socket.io library which runs the web sockets.
Now that we’ve defined out package.json file we need to install these dependencies. To do this, from the command like, type:
npm installIf you check the folder’s contents now you’ll see a few new files and folders, notably the node_modules folder which contains our libraries listed in the package.json file as well as all its dependencies, etc.
Now, we’ll create the actual application. To this, create a new file called app.js. Paste the following in:
1.  const express = require("express");
2.  const app = express();

3.  const http = require("http");
4.  const socketIo = require("socket.io");

5.  const redis = require("redis");

6.  const server = http.createServer(app);
7.  const io = socketIo(server, {
8.  	cors: {
9.  		origin: "*",
10.	}
11. });

12. server.listen(5000);

13. io.on("connection", socket => {
14. 	const subscriber = getRedisClient();

15.  	(async () => {
16. 		await subscriber.connect();
17. 	})();


	///////////////////////////////////////////////////////////////////
	//
	// TEMPERATURE EVENT - PAGE SPECIFIC
	//
	// A front end nuxt client has connected and
	// we're subscribe them to the channelName
	//
	////////////////////////////////////////////////////////////////////
18.	socket.on("subscribe-from-temperature-page-in-nuxt", (clientChannel) => {
19. 		console.log("subscribe-from-temperature-page-in-nuxt: " + clientChannel);
20.		subscriber.subscribe(clientChannel, (message, channel) => {
21.			console.log(`Received ${message} from ${channel}`);
22.			socket.emit(clientChannel, message);
23.		});

24.		console.log("let nuxt know that its subscribed to subscribed to " + clientChannel);
25.		socket.emit(clientChannel, "subscribed to " + clientChannel);
26.	});

	///////////////////////////////////////////////////////////////////
	//
	// GENERAL EVENT
	//
	// A front end nuxt client has connected and
	// we're subscribe them to the channelName
	//
	////////////////////////////////////////////////////////////////////
27.	socket.on("subscribe-from-general-page-in-nuxt", (clientChannel) => {
		console.log("subscribe-from-general-page-in-nuxt on channel: " + clientChannel);
28. 		subscriber.subscribe(clientChannel, (message, channel) => {
29.			console.log(`Received ${message} from ${channel}`);
30.			socket.emit(clientChannel, message);
31.		});

32.		console.log("let nuxt know that its subscribed to subscribed to " + clientChannel);
33.		socket.emit(clientChannel, "subscribed to " + clientChannel);
34.	});


35.	socket.on("disconnect", () => {
36.		console.log("disconnected");
37.		subscriber.quit();
38.	});

39.	socket.emit("connected");
40. });


41. const getRedisClient = () => {
42.	const redisClient = redis.createClient({
43.		socket: {
44.			host: "localhost",
45.			port: 6379,
46.		},
47.	});

48.	redisClient.on("error", function(err) {
49.		console.error("redis error: ", err);
50.	});

51.	redisClient.on("ready", () => {
52.		console.log("connected to redis");
53.	});

54.	return redisClient;
55. }
In lines 1 to 11 we’re simply setting up our app by including the libraries we need. On line 12 we set our server to listen on port 5000, but you can change that to whatever port number suits you.
On line 13 we wait for a connection from the client. Once we have a client connection we subscribe to the Redis service on line 14. The Redis connection code for that starts on line 41.
Once a client has connected node emits an event in line 39 called connected. This event is received by our NuxtJs app (socket.on(“connected”, () => {… ). The NuxtJs app receives this event and then it (NuxtJs) emits a subscribe event with the channel its subscribing to (eg, channel name general).
On lines 18 to 26 and 27 to 34 we set up our client connection handlers. In this case our connection handlers for subscribe-from-temperature-page-in-nuxt and subscribe-from-general-page-in-nuxt are identical and we probably only need one because we could determine which of the events are being triggered by the channel, but we’ll keep both in here for clarity.
On line 20 we subscribe the client to this channel so that NodeJs can keep track of who it needs to notify when data arrives from the back end. We emit a message back to the client that it has subscribed (ie, its got an open socket connection and can receive messages from the server). Emitting this event is probably not required in this example but your NuxtJs in a real app may need to know that’s its actually subscribed.
To start our app.js, we type the following in on the command line:
node app.js4. Client Code
Ok, lastly(ish) our client code. We’re going to do this Nuxt 3. To start our Nuxt 3 app, take a look at the documentation at https://nuxt.com/. The create-nuxt-app will create a new directory for you so no need to create one. We’ll call this app client-socket:
npx nuxi@latest init client-socketThis will ask you to fill in a few options. You can select the options as per your requirements.
Once that installation is done you can cd into the created client-socket (or whatever you called your project directory) and type:
npm install
npm run dev
This will start the next dev server, usually at port 3000 and you should see something like this:
? Waiting for file changes                                            19:38:28
? Memory usage: 260 MB (RSS: 365 MB)                                  19:38:28
? Listening on: http://localhost:3000/
You can open your browser to http://localhost:3000 as directed to view the default Nuxt 3 application.
Nuxt 3 Code
Let’s get coding! When you create your Nuxt 3 app, it scaffolds a basic project. We’ll cd into the pages directory and copy the index.vue page twice. One we’ll call temperature.vue and one we’ll call general.vue (note the similarity with the Laravel API end points).
If we do a listing (ls) in the pages directory we should see all three .vue files, like this:

In a Vue file, the display part goes between the <template></template> tags and the code part goes between the <script></script> tags. You can remove the content between those and also add the setup modifier to the script tag (I like the script setup method and composition API when working with Vue and Nuxt, like this:
<template>

</template>

<script setup>

</script>
Before we get to adding our own code, we need to add the socket.io package (from socket.io). To do this, in the root of your Nuxt 3 project we install it via npm:
npm install socket.io-clientOnce that’s been installed, we can inspect our package.json file to see this package listed under the dependencies.
General Page
The general page in our NuxtJs app is a page where everyone who is on this page will receive the same notification. Here’s the code for that:
<script setup>
import { io } from 'socket.io-client';

const channelUrl  = "http://localhost";
const channelPort = "5000";
const channelName = "generalEvent";

let messages = ref([]);

onMounted(() => {

  if (channelUrl != "" && channelPort != "") {
    const socket = io(channelUrl + ":" + channelPort);

    socket.on("connected", () => {
        console.log("Connected to node server, subscribing to channel: " + channelName);
        socket.emit("subscribe-from-general-page-in-nuxt", channelName);
    });

    socket.on(channelName, (data) => {
        messages.value.push(data);
    });

  }

});

</script>

<template>
    <h1>General Page</h1>
    <p>Waiting for data from your back end server. It will show up below when we receive it:</p>

    <ul>
        <li v-for="(message, index) in messages" :key="index">{{ message }}</li>
    </ul>
</template>
This is a very simple NuxtJs page which connects to the NodeJs server and then waits for events (socket.on(channelName…..). When data comes in it pushes it to our messages array and then through the wonder of reactivity it adds the message to our page’s li.
Temperature Page
The code for the temperature page is below. Its a little different because our channelName is made up partly from the page slug (in this case a city name), eg, johannesburgEvent.
<script setup>
import { io } from 'socket.io-client';

let { city } = useRoute().params;

const channelUrl  = "http://localhost";
const channelPort = "5000";
const channelName = city + "Event";

let messages = ref([]);

onMounted(() => {
  if (channelUrl != "" && channelPort != "") {
    const socket = io(channelUrl + ":" + channelPort);

    socket.on("connected", () => {
        console.log("Connected to node server, subscribing to channel: " + channelName);
        socket.emit("subscribe-from-temperature-page-in-nuxt", channelName);
    });

    socket.on(channelName, (data) => {
        messages.value.push(data);
    });

  }

});

</script>

<template>
    <h1>Temperature Page: {{ city }}</h1>
    <p>Waiting for data from your back end server. It will show up below when we receive it:</p>

    <ul>
        <li v-for="(message, index) in messages" :key="index">{{ message }}</li>
    </ul>
</template>
Because our channel name is made up with the city name this implies that users who are on different city pages will see only the data for that city. So if you’re on page /temperature/london and I’m on /temperature/johannesburg, I will only see notices relevant to Johannesburg.
Time to Run!
To run this you need to start your node server by cd’ing into your nodejs app and then typing:
node app.jsNext, start up your NuxtJs front end:
npm run devThis will likely start your NuxtJs app at http://localhost:3000.
Then, we start our back end server. Because its Laravel its really simple:
php artisan serveThis will likely start it up at http://localhost:8000.
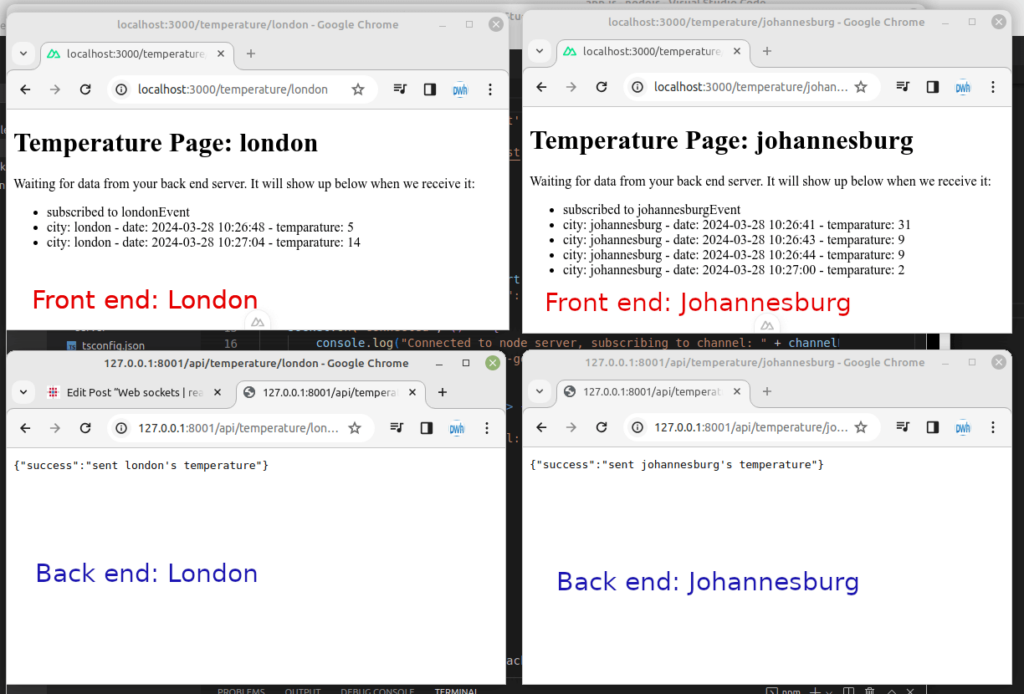
Now, navigate to http://localhost:3000/general. This is our front end code. You should see it connect and then add a message to our li that its connected.
Keep this page open. In a new tab/browser window navigate to http://localhost:8000/api/general. You should see a new message magically appear in your front end window. You can refresh your back end api page to see messages continually appear!
To test the temperature functionality, on your front end open two tabs, eg: http://localhost:3000/temperature/johannesburg and http://localhost:3000/temperature/london.
Then on open two more windows in and navigate to http://localhost:8000/api/temperature/johannesburg and http://localhost:8000/api/temperature/london.
You should now see these messages appear on their respective pages in the front end tabs!
Source Code
The source code for this blog can be found at https://github.com/jsmcm/blogs.php.websockets.
Note, usually blogs are a single code base, like one Laravel project etc. In this case our repo has all three projects so everything is in one place for you.
John, a seasoned Freelance Full Stack Developer based in South Africa, specialises in delivering bespoke solutions tailored to your needs. With expertise in back end languages and frameworks, PHP, Laravel and Golang and Front end frame words Vue3, Nuxt3 as well as Angular, I am equipped to tackle any project, ensuring robust, scalable, and cutting-edge outcomes.
My comprehensive skill set enables me to provide exceptional freelance services both remotely and in person. Whether you’re seeking to develop an innovative application or require meticulous refinement of existing systems, I am dedicated to elevating your digital presence through unparalleled technical prowess and strategic development methodologies. Let’s connect to transform your vision into reality.